Purchase 4: with payment instructions, the QR code, or in the mobile app
The customer follows the payment instructions displayed on the checkout page or in your system (when performing the purchase by using Gate). Then the customer transfers funds using payment details or by scanning the QR code, or clicks the button to go to the mobile app to complete the payment.
| Countries and regions | India |
| Payment currencies | INR |
| Payment amount limits | Contact your key account manager at Monetix for details. Also you can check the payment amount limits in your project by using Dashboard. |
| Payment processing time | Contact your key account manager at Monetix for details. |
| Currency conversion | On the Monetix side |
| Refund |  |
| Onboarding and access fee | Contact your key account manager at Monetix for details. |
Operations support
| Interfaces | |||
|---|---|---|---|
| Payment Page | Gate | Dashboard | |
| Purchase |  |
|
|
You can check the payment amount limits in your project by using Dashboard. To check your payment amount limits, go to Dashboard, select the Projects section, and then click the Payment methods tab.
The following sections provide more information about the payment processing flow and the analysis of completed payments.
Purchase by using Payment Page
General information
To perform a purchase by using Payment Page with the PhonePe payment method:
- Send a request with all the required parameters and signature to the Monetix URL.
- Accept the callback with the purchase result from the payment platform.
The following figure shows the complete purchase processing flow in the PhonePe payment method.
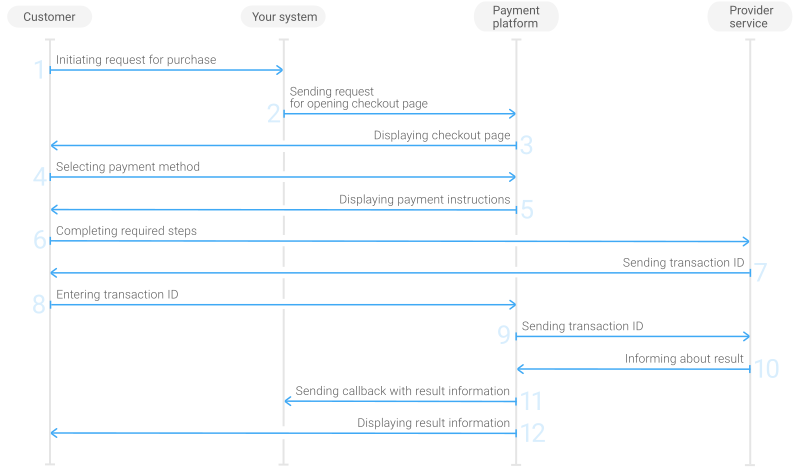
- The customer initiates a purchase in your system.
- Your system sends the request for the purchase through Payment Page to the Monetix URL.
- The checkout page is displayed to the customer.
- The customer chooses to make a purchase with the PhonePe payment method.
- The checkout page displays payment details, the QR code, and buttons for the customer to go to the mobile app.
- The customer completes the payment using the payment details or by scanning the QR code, or goes to the mobile app to complete the payment.
- The provider service sends the transaction ID to the customer.
- The customer enters the transaction ID on the checkout page.
- The payment platform forwards the request with the transaction ID to the provider service.
- The provider service sends the purchase result information to the payment platform.
- The payment platform sends a callback with the payment result to your system.
- The payment platform displays the payment result to the customer on the checkout page.
Request
The following table lists the parameters that you have to include in the request for purchase through the checkout page with the PhonePe payment method.
|
||
|---|---|---|
| Parameter | Description | |
project_id | Project ID you obtained from Monetix when integrating. Example: | |
payment_id | Payment ID unique within your project. Example: | |
customer_id | Unique ID of the customer within your project. Example: | |
customer_first_name | Customer's first name. Example: | |
customer_last_name | Customer's last name. Example: | |
customer_email | Customer's email. Example: | |
payment_currency | Code of the payment currency in the ISO-4217 alpha-3 format.
Example: | |
payment_amount | Payment amount in minor currency units without any decimal point or comma except for the cases when the currency doesn't have any minor currency units. If the currency doesn't have any minor units (i.e. the number of digits for minor currency units is zero), set this parameter to the amount in the major currency units. To check whether the currency has any minor units, see Currency units and Currency codes. Example: 2.50 INR must be sent as | |
force_payment_method | Parameter that allows you to enforce the PhonePe payment method for your customer and skip the page with payment method selections. To enforce the PhonePe payment method and skip the page with payment method selection, add the force_payment_method parameter to the request and set its value to Example: | |
signature | Signature created after you've specified all the request parameters. For more information about signature generation, see Signature generation and verification. | |
| You can also add any other optional parameters to the request, if necessary. For the list of all the parameters possible in requests to Payment Page, see Payment Page invocation parameters. | ||
Here is an example of the data from a request to open the checkout page by using
EPayWidget:
EPayWidget.run(
	{
		project_id: 1234,
		payment_id: 'payment_47',
		customer_id: 'customer_123',
		customer_first_name: 'John',
		customer_last_name: 'Doe',
		customer_email: 'johndoe@example.com',
		payment_currency: 'INR',
		payment_amount: 10000,
		force_payment_method: 'phonepe-wallet',
		signature: 'kUi2x9dKHAVNU0FYldJrxh4yo+52Kt8KU+Y19vySO/RLUkDJrOcZzUCwX6R/ekpZhkIQg=='
	}
)
Callback
In the PhonePe payment method, the payment platform returns the purchase result in a callback. For the information about the callback structure, see Callbacks in Payment Page.
The following is an example of a callback body with information about a successfully completed purchase.
{
    "project_id": 1234,
    "payment": {
        "id": "payment_47",
        "type": "purchase",
        "status": "success",
        "date": "2024-12-07T19:08:45+0000",
        "method": "phonepe",
        "sum": {
            "amount": 10000,
            "currency": "INR"
        },
        "description": ""
    },
    "customer": {
        "id": "customer_123"
    },
    "operation": {
        "id": 47,
        "type": "sale",
        "status": "success",
        "date": "2024-12-07T19:08:45+0000",
        "created_date": "2024-12-07T19:08:05+0000",
        "request_id": "1a23456bc7890de",
        "sum_initial": {
            "amount": 10000,
            "currency": "INR"
        },
        "sum_converted": {
            "amount": 10000,
            "currency": "INR"
        },
        "code": "0",
        "message": "Success",
        "provider": {
            "id": 12345,
            "payment_id": "123abc123-123",
            "auth_code": ""
        }
    },
    "signature": "U7HQO7ToISZhMPKdM4XrUKQtoYzFvoB3cs9CRd4xeYG2Q=="
}
The following is an example of a callback for a declined purchase.
{
    "project_id": 1234,
    "payment": {
        "id": "payment_47",
        "type": "purchase",
        "status": "decline",
        "date": "2024-12-07T19:08:45+0000",
        "method": "phonepe",
        "sum": {
            "amount": 10000,
            "currency": "INR"
        },
        "description": ""
    },
    "customer": {
        "id": "customer_123"
    },
    "operation": {
        "id": 47,
        "type": "sale",
        "status": "decline",
        "date": "2024-12-07T19:08:45+0000",
        "created_date": "2024-12-07T19:08:05+0000",
        "request_id": "1a23456bc7890de",
        "sum_initial": {
            "amount": 10000,
            "currency": "INR"
        },
        "sum_converted": {
            "amount": 10000,
            "currency": "INR"
        },
        "code": "20000",
        "message": "General decline",
        "provider": {
            "id": 12345,
            "payment_id": "123abc123-123",
            "auth_code": ""
        }
    },
    "signature": "U7HQO7ToISZhMPKdM4XrUKQtoYzFvoB3cs9CRd4xeYG2Q=="
}
Purchase by using Gate
General information
To perform a purchase by using Gate with the PhonePe payment method:
- Send a request with all the required parameters and signature to the Monetix URL.
- Show the screen with payment details, the QR code, and button redirecting to the mobile app to the customer.
- Accept the callback with the purchase result from the payment platform.
The following figure provides the details of the purchase processing flow in the PhonePe payment method.
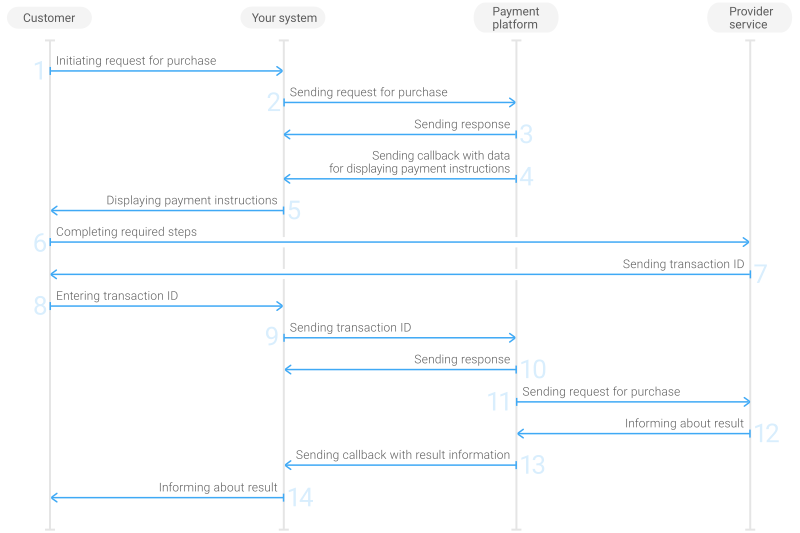
- The customer initiates a purchase in your system.
- Your system sends the purchase request to the Monetix payment platform.
- The payment platform sends you a response in which it acknowledges your request and provides the request validation result. (For more information about the response format, see Response structure.)
- The payment platform sends your system the payment details, QR code data, and a deep link to the mobile app in the display_data array.
- Your system displays the payment details, QR code data, and the buttons redirecting to the mobile app to the customer.
- The customer completes the payment by using the payment details or scanning the QR code, or goes to the mobile app to complete the payment.
- The provider service sends the transaction ID to the customer.
- The customer enters the transaction ID in your system.
- Your system sends the request with the transaction ID to the payment platform.
- The payment platform sends your system the response in which it acknowledges your request and provides the request validation result. (For more information about the response format, see Response structure.)
- The payment platform forwards the request with the transaction ID to the provider service.
- The provider service informs the payment platform about the purchase result.
- The payment platform sends the callback with the payment result to your system.
- Your system sends the payment result to the customer.
Request
This section provides the instructions on how to build the request for purchase with the PhonePe payment method.
| HTTP request method | POST |
| Request body format | JSON |
| API endpoint | /v2/payment/wallet/phonepe/sale |
| Full API endpoint specification | /v2/payment/wallet/{payment_method}/sale |
|
|||
|---|---|---|---|
| Object | Parameter | Description | |
general | project_id | Project ID you obtained from Monetix when integrating. Example: | |
payment_id | Payment ID unique within your project. Example: | ||
signature | Signature created after you've specified all the request parameters. For more information about signature generation, see Signature generation and verification. | ||
customer | id | Unique ID of the customer within your project. Example: | |
ip_address | IP address of the customer's device. Example: | ||
first_name | Customer's first name. Example: | ||
last_name | Customer's last name. Example: | ||
email | Customer's email. Example: | ||
payment | currency | Code of the payment currency in the ISO-4217 alpha-3 format. Example: | |
amount | Payment amount in minor currency units without any decimal point or comma except for the cases when the currency doesn't have any minor currency units. If the currency doesn't have any minor units (i.e. the number of digits for minor currency units is zero), set this parameter to the amount in the major currency units. To check whether the currency has any minor units, see Currency units and Currency codes. Example: 2.50 INR must be sent as | ||
| You can also add any other optional parameters to the purchase request, if necessary. For the list of all the parameters available in Gate, see API Reference. | |||
Here is an example of the data from a request to initiate a purchase with the PhonePe payment method:
{
    "general": {
        "project_id": 1234,
        "payment_id": "payment_47",
        "signature": "kUi2x9dKHAVNU0FYldJrxh4yo+52Kt8KU+Y19vySO/RLUkDJrOcZzUCwX6R/ekpZhkIQg=="
    },
    "customer": {
        "id": "customer_123",
        "ip_address": "198.51.100.47",
        "first_name": "John",
        "last_name": "Doe",
        "email": "johndoe@example.com"
    },
    "payment": {
        "currency": "INR",
        "amount": 10000
    }
}
Displaying the payment instructions to the customer
After receiving and processing your purchase request, the payment platform sends you the callback with the data for displaying the payment instructions to the customer.
Use the data from the display_data array to display the payment instructions to the customer.
| Element | Description |
|---|---|
{
    "type": "add_info",
    "title": "receiver_name",
    "data": "Mark Doe"
}
|
Payment recipient's full name. Example: |
{
    "type": "add_info",
    "title": "vpa",
    "data": "mark_d_example@ptaxis"
}
|
Payment recipient's virtual payment address (VPA). Example: |
{
    "type": "add_info",
    "title": "receiver_account",
    "data": "mark_d_example@ptaxis"
}
|
Payment recipient's virtual payment address (VPA). Example: |
{
    "type": "add_info",
    "title": "amount",
    "data": "10000"
}
|
Payment amount. Example: |
{
    "type": "add_info",
    "title": "currency",
    "data": "INR"
}
|
Payment currency. Example: |
{
    "type": "add_info",
    "title": "lifetime",
    "data": "1811841600"
}
|
Expiration time of the payment instruction. Provided in the Unix timestamp format. The customer must complete the purchase before the specified time. Example: |
| The QR code to be displayed to the customer is submitted in the following object: | |
{
    "type": "qr_data",
    "title": "qr_data",
    "data": "phonepe://exampleqrcode"
}
|
The data that should be encoded in the QR code. Example: |
| The link to redirect the customer to the mobile app is submitted in the following object: | |
{
    "type": "add_info",
    "title": "url_phonepe",
    "data": "phonepe://examplelink"
}
|
The link for the customer to go to the PhonePe mobile app. Example: |
The following is the callback fragment containing display_data array.
"display_data": [
    {
        "type": "add_info",
        "title": "receiver_name",
        "data": "Mark Doe"
    },
    {
        "type": "add_info",
        "title": "vpa",
        "data": "mark_d_example@ptaxis"
    },
    {
        "type": "add_info",
        "title": "receiver_account",
        "data": "mark_d_example@ptaxis"
    },
    {
        "type": "add_info",
        "title": "amount",
        "data": "10000"
    },
    {
        "type": "add_info",
        "title": "currency",
        "data": "INR"
    },
    {
        "type": "add_info",
        "title": "lifetime",
        "data": "1811841600"
    },
    {
        "type": "qr_data",
        "title": "qr_data",
        "data": "phonepe://exampleqrcode"
    },
    {
        "type": "add_info",
        "title": "url_phonepe",
        "data": "phonepe://examplelink"
    }
]
Submitting UTR number to the payment platform
After you received UTR number from the customer, send it to the payment platform in a new request. Listed below are the instructions on how to build the request with UTR number.
| HTTP request method | POST |
| Request body format | JSON |
| API endpoint | /v2/payment/clarification |
|
||||
|---|---|---|---|---|
| Object | Object/Parameter | Description | ||
general | project_id | Project ID you obtained from Monetix when integrating. Example: | ||
payment_id | Payment ID unique within your project. Example: | |||
signature | Signature created after you've specified all the request parameters. For more information about signature generation, see Signature generation and verification. | |||
additional_data | additional_data | utr_number | The UTR number your customer obtained from the PhonePe service. Consists of 12 digits. Example: | |
| You can also add any other optional parameters to the request, if necessary. For the list of all the parameters available in Gate, see API Reference. | ||||
Here is an example of the data from the request with UTR number:
{
    "general": {
        "project_id": 1234,
        "payment_id": "payment_47",
        "signature": "kUi2x9dKHAVNU0FYldJrxh4yo+52Kt8KU+Y19vySO/RLUkDJrOcZzUCwX6R/ekpZhkIQg=="
    },
    "additional_data": {
        "additional_data": {
            "utr_number": "123456789012"
        }
    }
}
Callback
In the PhonePe payment method, the payment platform returns the purchase result in a callback. For the information about the callback structure, see Callbacks in Gate.
The following is an example of a callback body with the information about a successfully completed purchase.
{
    "project_id": 1234,
    "payment": {
        "id": "payment_47",
        "type": "purchase",
        "status": "success",
        "date": "2024-12-07T19:08:45+0000",
        "method": "phonepe",
        "sum": {
            "amount": 10000,
            "currency": "INR"
        },
        "description": ""
    },
    "customer": {
        "id": "customer_123"
    },
    "operation": {
        "id": 47,
        "type": "sale",
        "status": "success",
        "date": "2024-12-07T19:08:45+0000",
        "created_date": "2024-12-07T19:08:05+0000",
        "request_id": "1a23456bc7890de",
        "sum_initial": {
            "amount": 10000,
            "currency": "INR"
        },
        "sum_converted": {
            "amount": 10000,
            "currency": "INR"
        },
        "code": "0",
        "message": "Success",
        "provider": {
            "id": 12345,
            "payment_id": "123abc123-123",
            "auth_code": ""
        }
    },
    "signature": "U7HQO7ToISZhMPKdM4XrUKQtoYzFvoB3cs9CRd4xeYG2Q=="
}
The following is an example of a callback for a declined purchase.
{
    "project_id": 1234,
    "payment": {
        "id": "payment_47",
        "type": "purchase",
        "status": "decline",
        "date": "2024-12-07T19:08:45+0000",
        "method": "phonepe",
        "sum": {
            "amount": 10000,
            "currency": "INR"
        },
        "description": ""
    },
    "customer": {
        "id": "customer_123"
    },
    "operation": {
        "id": 47,
        "type": "sale",
        "status": "decline",
        "date": "2024-12-07T19:08:45+0000",
        "created_date": "2024-12-07T19:08:05+0000",
        "request_id": "1a23456bc7890de",
        "sum_initial": {
            "amount": 10000,
            "currency": "INR"
        },
        "sum_converted": {
            "amount": 10000,
            "currency": "INR"
        },
        "code": "20000",
        "message": "General decline",
        "provider": {
            "id": 12345,
            "payment_id": "123abc123-123",
            "auth_code": ""
        }
    },
    "signature": "U7HQO7ToISZhMPKdM4XrUKQtoYzFvoB3cs9CRd4xeYG2Q=="
}